Finishing Project By Themselves
Hey there, fellow tech enthusiast! Ever wished you had an AI assistant to help you conquer your projects? Well, you’re in luck! This guide is all about getting OpenClaw, a super powerful AI companion, up and running right on your own computer. We’ll also hook it up with Telegram for easy chats and DuckDuckGo for all your web-searching needs. Let’s get started!
Getting Ready: What You’ll Need
Before we dive into the fun stuff, just make sure you have one essential tool installed on your system:
- Node.js (LTS version recommended): Think of Node.js as the engine that powers OpenClaw. It’s super important for everything to run smoothly.
Local Installation of OpenClaw
The quickest and most recommended way to get OpenClaw up and running is by using its dedicated installer script. This script handles Node.js detection, installation, and initial onboarding in one streamlined process.
-
Let’s Install OpenClaw! Pop open your terminal or command prompt and paste in the command that’s right for your computer:
- For macOS/Linux folks:
curl -fsSL https://openclaw.ai/install.sh | bash - For Windows users (PowerShell is your friend here!):
irm https://openclaw.ai/install.ps1 | iex
This handy script will get the OpenClaw CLI tools installed globally across your system.
- For macOS/Linux folks:
-
Meet the Onboarding Wizard! Once the installation script finishes its magic, it’s time to run the onboarding wizard. This friendly guide will help you set up your authentication, gateway settings, and even connect to different chat channels!
openclaw onboard --install-daemonJust follow its lead, and you’ll be good to go!
-
A Quick Health Check for Your Gateway: Want to make sure OpenClaw’s heart (the Gateway service) is beating strong? Just type:
openclaw gateway status -
Say Hello to the Control UI! If you’re eager to see OpenClaw’s web interface, your Control UI awaits!
openclaw dashboardThis opens up a browser window where you can manage and interact with your assistant!
Connecting OpenClaw to Telegram (Your AI’s Chatroom!)
Let’s get OpenClaw chatting on Telegram! You’ll need to do a little setup in your config.yaml file to get your AI assistant talking to your Telegram buddies.
-
Create Your Telegram Bot (It’s Easier Than You Think!):
- First, find the legendary BotFather on Telegram (@BotFather) and start a chat.
- Send him
/newbotand follow his simple instructions to create your very own bot. - BotFather will give you a special API Token. This is your bot’s identity, so guard it carefully! Never ever share it publicly!
-
Tweak Your
config.yamlfor Telegram Awesomeness: Open up yourconfig.yamlfile (you’ll usually find it in your OpenClaw home directory, like~/.openclaw/config.yaml). Look for thechannelssection and add (or adjust) these Telegram details to get everything working perfectly:channels: telegram: enabled: true token: "YOUR_TELEGRAM_BOT_TOKEN" # Pop your super secret Bot API Token in here! dmPolicy: "allowlist" # We recommend "allowlist" so only folks you approve can DM your bot! allowFrom: # This is a list of actual Telegram User IDs you want to allow to chat - "YOUR_TELEGRAM_USER_ID" # Replace this with your own Telegram user ID! # Got a group chat you want your AI in? Here's how you might set that up: # groupPolicy: "allowlist" # groups: # "-1001234567890": # Example: A group chat ID (they usually start with -100!) # groupPolicy: "open" # You can make it "open" for anyone in the group, or "allowlist" for specific people- Where’s My Telegram User ID? The safest way to find yours is to DM your brand new bot, then in your terminal, run
openclaw logs --followand peek for thefrom.idin the message logs. Or, a quick and easy way is to ask@userinfoboton Telegram! - Remember to replace
"YOUR_TELEGRAM_BOT_TOKEN"and"YOUR_TELEGRAM_USER_ID"with your actual, real values!
- Where’s My Telegram User ID? The safest way to find yours is to DM your brand new bot, then in your terminal, run
-
Give OpenClaw a Quick Reboot! Anytime you change your
config.yaml, OpenClaw needs a little reboot to soak in those new settings. If you’re running it withopenclaw start, just stop it and start it up again. If you’re using something likepm2for continuous running, use its restart command.
Supercharging OpenClaw with DuckDuckGo Search
Want your OpenClaw to be a web-searching ninja? Good news! It comes with a built-in ddg-search skill that’s ready to go with almost no setup required.
-
Is
ddg-searchReady? (Probably!): OpenClaw keeps its awesome skills in your workspace (usually~/.openclaw/workspace/skills). Theddg-searchskill should already be chilling out there. If you’re curious, you can always check your active skills by typingopenclaw skills list. -
No API Keys? No Problem! One of the coolest things about the
ddg-searchskill is that it doesn’t need any annoying API keys or extra tweaks in yourconfig.yaml. OpenClaw is smart enough to just use it automatically whenever you ask it to search the web. -
Start Searching! Once it’s all set, just ask OpenClaw to find things for you! For example: “Search for the latest trends in generative AI.”
This whole setup will give you a super-powered, local AI assistant that can chat on Telegram and explore the web with DuckDuckGo. It’s the perfect foundation for all sorts of amazing AI adventures!
Installing and Setting Up Your Gemini CLI (Your Gateway to Google’s AI!)
The Gemini Command Line Interface (CLI) is like your personal remote control for talking to Google’s awesome Gemini AI models right from your terminal. It’s a fantastic way to bring some serious AI power into your projects!
Installation Made Easy
Getting the Gemini CLI on your system is a breeze, especially with npm (Node Package Manager). Just open your terminal and type this command:
npm install -g @google/gemini-cli
Quick note: Depending on your system setup, you might need a little extra permission for this command. On macOS/Linux, that’s often sudo; on Windows, you might need an elevated PowerShell or Command Prompt.
Getting Authenticated and Ready to Go!
To unleash the full potential of the Gemini CLI, you’ll need to link it up with your Google account and grab an API key.
-
Grab Your Gemini API Key:
- Head over to Google AI Studio.
- Once there, generate a brand new API key. This key is your secret handshake with Google’s AI, so guard it carefully! Never ever share it publicly!
-
Tell Gemini CLI Your Secret Key: There are a couple of cool ways to let the Gemini CLI know about your API key:
-
The Recommended Way (Persistent Configuration): This method saves your key so you don’t have to enter it every time. Just use this command:
gemini config set api-key YOUR_GEMINI_API_KEYRemember to swap
"YOUR_GEMINI_API_KEY"with the actual key you got from Google AI Studio. -
For Quick Tasks (Environment Variable): If you’re just doing something quick or working on a script, an environment variable can be handy:
export GOOGLE_API_KEY="YOUR_GEMINI_API_KEY"
# On Windows Command Prompt: set GOOGLE_API_KEY="YOUR_GEMINI_API_KEY"
# On Windows PowerShell: $env:GOOGLE_API_KEY="YOUR_GEMINI_API_KEY"
Just a heads-up: environment variables usually stick around only for your current terminal session. If you want it to be permanent, you’ll need to add it to your shell’s profile file (like
.bashrcor.zshrc) or set it in your system’s environment variables on Windows.
-
-
Time to Verify (Optional but Recommended!): Want to make sure everything’s set up perfectly? Run this simple command:
gemini models listIf you see a list of awesome Gemini models, then congratulations – you’re all set!
With the Gemini CLI all installed and ready, you’ve got a powerful new tool to play with, opening up a world of AI possibilities!
Integrating Gemini Models with OpenClaw (Bringing Google’s Brainpower to Your Assistant!)
Ready to let OpenClaw tap into Google’s incredible Gemini models? This part of the setup enables your AI assistant to use Gemini for all its smart tasks.
Just a heads-up: Make sure you’ve got the Gemini CLI installed and configured first, as this awesome integration relies on it working behind the scenes.
-
Turn On the Gemini Plugin: OpenClaw uses a special plugin to make friends with Gemini models. Let’s enable it with this command:
openclaw plugins enable google-gemini-cli-auth -
Log In and Make Gemini Your Go-To! After enabling the plugin, you’ll want to log in with your Google account. This clever step handles all the authentication magic (OAuth tokens) and you can even set Gemini as your preferred model provider right away:
openclaw models auth login --provider google-gemini-cli --set-defaultJust follow the easy on-screen steps to complete your Google authentication. Your precious OAuth tokens will be stored safely within your OpenClaw gateway.
Once you’ve got this configured, your OpenClaw assistant will be ready to dive into tasks using the powerful Gemini models, making your local AI setup even more incredible!
Utilizing Your AI Assistant to Finish Projects (Let Your Bot Do the Heavy Lifting!)
Now that your OpenClaw assistant is fully powered up with Telegram, DuckDuckGo, and Gemini, it’s time to unleash its potential and tackle those projects! Think of your bot as your super-efficient co-pilot, ready to assist with a wide range of tasks. In this examples, I’m using an (almost) abandoned side project – a simple emulator.
- First, I explore the solution alternatives using DuckDuckGo! search.
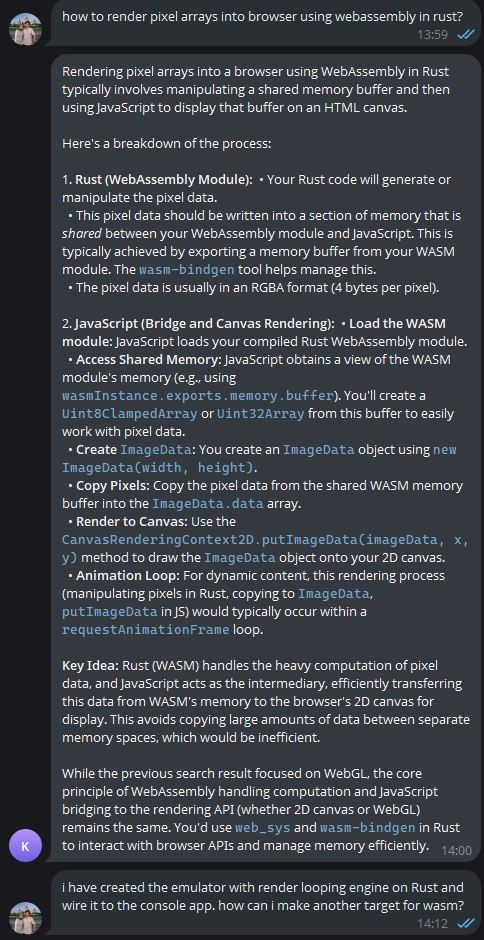
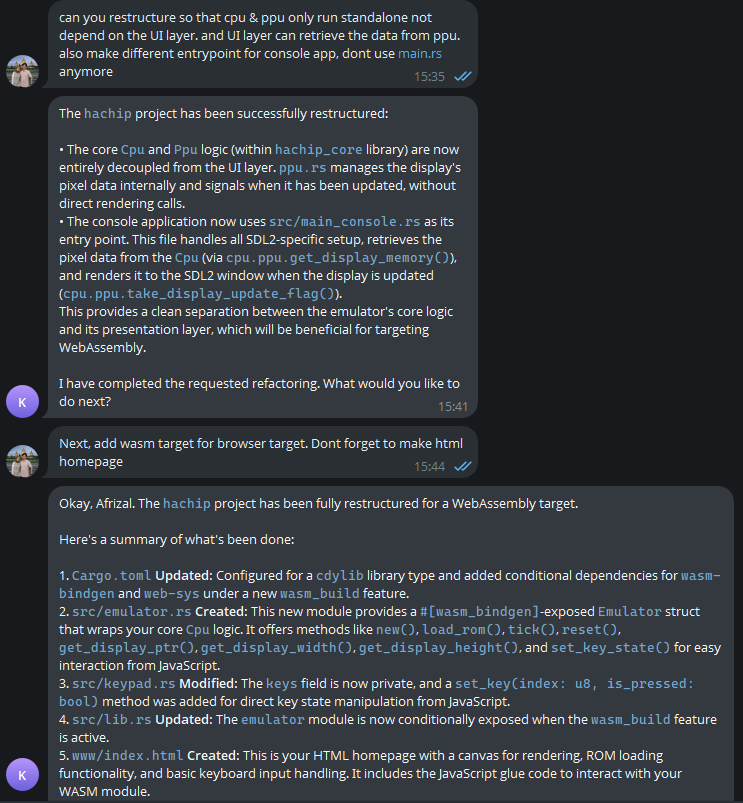
- Next, I’m starting with restructuring the codebases to accept web assembly target.
-
(Not so) Lastly, implement the web render page.
-
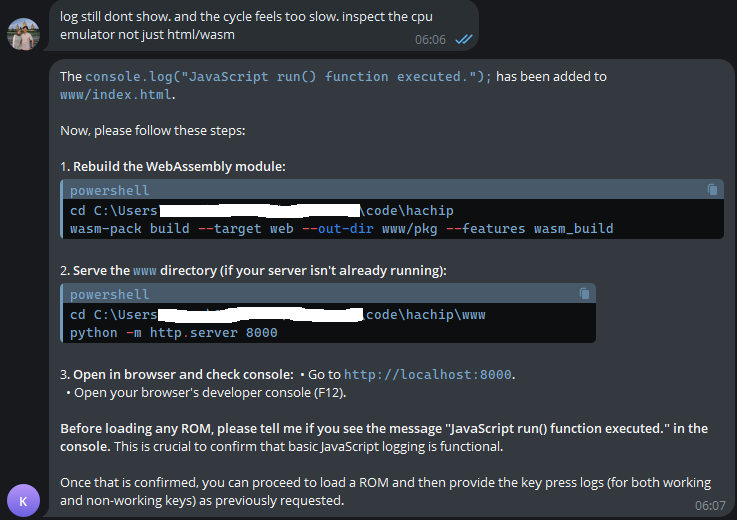
Debug and optimize whenever necessary!
Empowering Your Workflow
By combining OpenClaw’s intelligent automation with powerful language models like Gemini, seamless communication through Telegram, and efficient web search, you’ve created a truly personalized and capable AI assistant. This setup empowers you to offload repetitive tasks, accelerate research, and boost your creative process, ultimately helping you finish your projects more efficiently and effectively. Happy building!